.png "Product News, Tutorials, Tips and Industry Insights - ZWSOFT Blog - Stay up to date on the latest product news, tutorials, tips, and industry insights from ZWSOFT staff and influencers. Here we provide everything you need to help you get the most out of ZWSOFT products and succeed in your career.")
3D printing speed is a key factor in printing efficiency and model quality. The faster the printing speed, the less time it takes to complete the printing task with greater efficiency, thereby reducing printing costs. Additionally, the right speed ensures that complex structures and details can be accurately formed and the fineness of the design is maintained.
You may be wondering: What is a good 3D printing speed? How to speed up 3D printing speed? Don’t worry! This article will introduce you to everything you need to know, including the best 3D printer speed settings, tips for optimizing speed, etc., to help you find the perfect balance between printing speed and quality. Let’s get started!
| Note: If you’ve been considering or planning to switch 3D modeling software, don’t miss out on ZW3D. ZWSOFT has recently launched ZW3D 2025, retaining its powerful modeling capabilities while enhancing user experience and adding features to boost workflow efficiency. Plus, it offers a perpetual license option. If you’re interested, you can download a free trial. |
What Is 3D Print Speed and What’s the Normal Setting?
3D printing speed typically refers to how quickly the print head or nozzle moves along the X- and Y-axis to lay down each layer of thermoplastic filament during the printing process. Higher print speeds can increase productivity and save time, but the best quality is usually achieved at a slower 3D print speed, as too high a print speed can affect print quality and accuracy.
Besides the speed of the print head, many factors can affect print efficiency. For example, a higher layer height can speed up printing speed by depositing the molten plastic of each layer faster. Filaments with faster melting and cooling rates allow the 3D printer to start printing the next layer more quickly, thus increasing 3D printing speed. Additionally, other factors such as feed rate, model complexity, and print settings can also impact the final print speed.
Most 3D printers today can print at speeds ranging from 40 mm/s to 200 mm/s, with common print speed settings typically around 50-60 mm/s to provide a good balance of efficiency and quality. Additionally, it’s important to adjust these settings based on your specific needs. If you need to print a prototype quickly, you can increase the 3D printer print speed appropriately. If you need to print a high-precision model, you should reduce the printing speed.
How Printing Speed Affects Print Quality and Time
While increasing the 3D print speed may seem to reduce overall print times, it’s not always a wise choice.
Effects on Quality
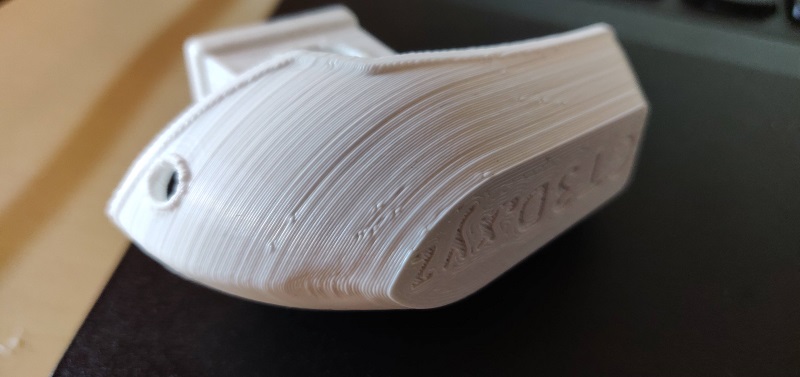
Faster 3D print speeds can lead to inaccuracies in material deposition, causing issues such as ringing, poor layer adhesion, under-extrusion, and filament clogging. Therefore, reducing print speeds is essential to achieve better print quality. However, this may result in longer print times and potentially higher costs.
Effects on Time
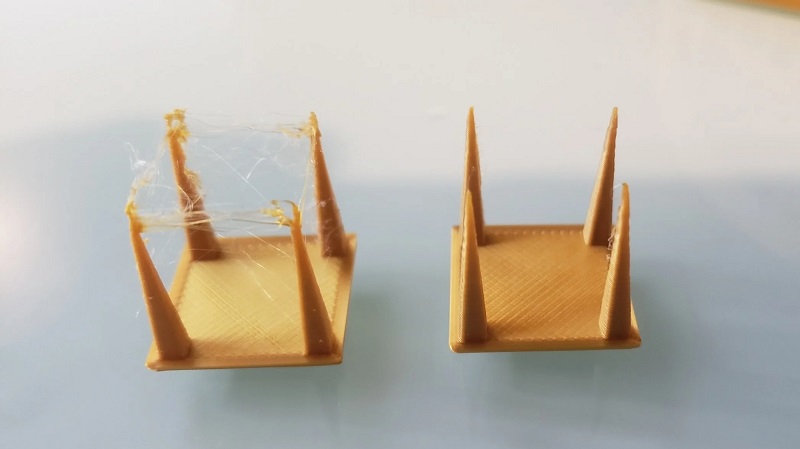
To speed up your 3D printing process, you can increase the 3D print speed. This can be done by getting a high-speed 3D printer or adjusting the settings on your current one. However, keep in mind that printing too fast may result in rough prints. Therefore, it’s best to conduct a 3D printer speed test beforehand to find the right printing speed for your needs.
Best 3D Print Speed Settings
What is a good 3D printing speed? Can you accelerate your printing process while still maintaining a high-quality output? This section will lead you to explore the best 3D printing speed settings to help you get the job done.
Print Speed
Although most slicers can automatically calculate the necessary filament extrusion to match the selected print speed, determining the ideal 3D printing speed remains challenging due to many influencing factors. Speeds that are too fast or too slow can lead to poor final output quality.
It is advisable to start at a slower speed, gradually increase it, and observe the print results to make adjustments. Typically, the initial speed of a 3D printer is recommended to be set between 40-60mm/s, as the printing speed within this range can ensure interlayer adhesion while maintaining the printing details and surface quality.
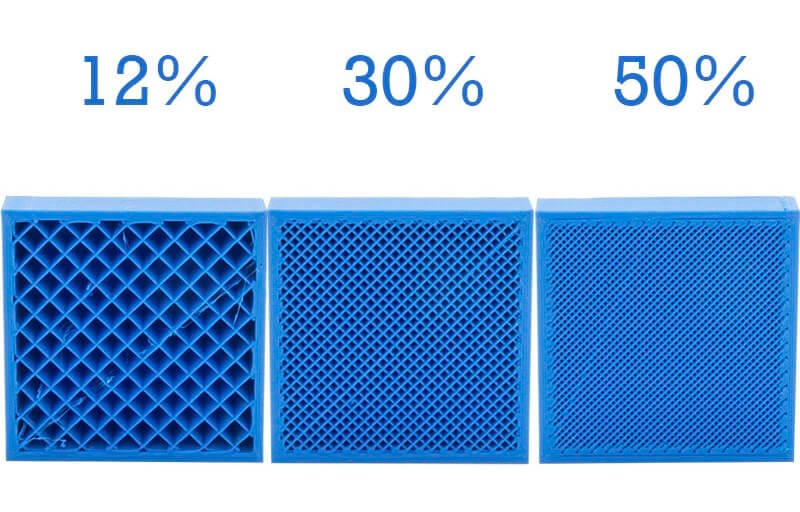
Infill Speed
Infill speed refers to how quickly the nozzle moves as it deposits material to create the interior structure of your 3D model. Since the interior structure is usually not visible, achieving a perfect infill finish is less important than the outer shell or top/bottom layers. Therefore, setting a faster infill speed can be ideal for quicker 3D printing, as long as it does not compromise the overall print quality.
However, if the infill speed is too fast, the fill material may not melt sufficiently in time, which could compromise the overall strength of your print. Therefore, it is recommended to set the infill speed between 50-80 mm/s for the best results.
Top/Bottom Speed
Unlike interior layers, the top and bottom are usually the most visible parts of your 3D-printed model, so they need to be printed more finely than the infill parts. Moreover, these layers are usually thicker than the infill material, which can lead to problems such as uneven surfaces and poor adhesion between layers if the 3D print speed is too fast.
To ensure a smooth surface and precise edges, it is advisable to set a slower print speed. This helps to minimize vibration and distortion caused by fast movements, which improves the final print quality. The ideal top and bottom print speed can be set between 30-50 mm/s.
Outer Wall Speed
As with the top and bottom, the outer wall speed is crucial to the final look of your 3D print. To achieve a smooth surface with clear details, a slower outer wall printing speed is recommended. A lower 3D printing speed allows the filament to be fully cooled and solidified, resulting in a smoother finish.
In general, the outer wall speed is set to be the same as or slightly slower than the top/bottom speed. A setting between 20-45 mm/s is a good starting point.
Inner Wall Speed
The inner wall is typically an invisible part of your 3D model, so surface smoothness is not a primary consideration. Properly increasing the interior wall speed can improve printing efficiency while maintaining a tight interior infill structure without reducing the overall strength and stability of the print.
However, it is not a wise option to set the inner wall speed too high, as this may lead to filaments not being fully melted, resulting in gaps between print lines. Therefore, it is advisable to keep the internal wall speed in the range of 30-60 mm/s.
Travel Speed
Travel speed is the speed at which the print head moves from one position to another when not extruding filament. Increasing travel speed can be effective in saving a lot of printing time and reducing defects such as oozing and stringing.
It’s important to note that setting an appropriate travel speed between 100-150 mm/s is crucial, as excessive travel speed can make the print head unstable, potentially causing problems such as ringing, ghosting artifacts, layer shifting, warping, and so on.
Retraction Speed
Before the print head stops or moves to the next position, using an appropriate retraction speed can effectively prevent filaments from bleeding, while also reducing burrs and color streaks on the surface of the printed part, making the print result clearer and more accurate.
The optimal retraction speed setting varies depending on the 3D printer model. However, the common setting range is usually between 40-60 mm/s. It’s crucial to note that setting the speed too high can damage the filament or cause the extruder to malfunction, while a slower speed can cause stringing issues.
Other Speed Settings
- Support Speed – In 3D printing, support speed setting is critical for overhangs like bridging. It helps prevent them from sagging or warping during the printing process. While a slower speed will ensure a stronger support structure, a common support speed setting is 50-80mm/s to balance print time and quality.
- Gradual Speed – When 3D printing objects with large height differences, the gradual speed should be similar to the print speed to ensure a smooth transition. This helps avoid vibrations during printing or prevents defects such as noticeable turning marks or sharp corners.
- First Layer Speed – The first layer is important to ensure that the model adheres to the building surface. If the first layer does not adhere firmly, it may cause printing failure. Therefore, it is recommended to 3D print the first layer at a lower speed (such as 20-30mm/s) for better adhesion.
- Jerk Speed – Jerk speed defines the acceleration of the print head when it changes direction or speed, and is typically set between 20 and 40 mm/s. Setting a suitable jerk speed can reduce the vibration of the print head when it moves quickly, thereby improving the print quality of the surface.
Practical Tips to Optimize 3D Printing Speed
Time-consuming 3D printing is a common problem for 3D printing enthusiasts who want to be more efficient. Here are some ways to help.
- Use a high-speed 3D printer. This is one of the effective ways to optimize printing speed. High-speed 3D printers are equipped with more powerful motors and advanced motion systems, which can provide greater acceleration and faster braking, resulting in more efficient 3D printing speed However, their price is also much higher.
- Adjust 3D print speed Increasing the 3D printing speed is the key to directly shorten the printing time. In addition, adjusting the print speed according to different parts of the printed object, such as the outer wall, inner wall, infill, and support structure, can help achieve better-quality print results.
- Use a larger nozzle. The default nozzle size for most 3D printer extruders is 0.4mm. If you want to increase 3D printing speed and allow more filament to be extruded through the 3D printer, consider using a 0.6mm or 0.8mm nozzle. However, if you prioritize printing details a larger nozzle is not advisable.
- Increase layer height. Increasing the layer height is one of the common ways to optimize 3D printing speed, but the maximum layer height should not exceed 80% of the nozzle diameter. Doing so can reduce the number of layers needed to print, thereby reducing overall 3D print time, but may sacrifice print accuracy.
- Select a powerful slicer. Using a powerful slicer that supports advanced settings allows you to precisely control print speed and other parameters for optimal printing results. Plus, many slicers offer features to optimize 3D print speed, such as adjusting fill density or support structures to reduce 3D printing time.
FAQs About 3D Printing Speed
Are There Any Good High Speed 3D Printers Available?
For projects with tight deadlines, a high-speed 3D printer can provide a quick solution to increase productivity. There are now many viable options on the market, such as the Creative K1C. This 3D printer boasts lightweight and agile CoreXY motion construction for exceptional speed while maintaining print quality.
Its max 3D print speed can reach 600 mm/s, with a max acceleration of 20,000 mm/s². In addition, additional features are also offered, such as an air filter, all-metalized extruder, 1080P AI camera, anti-vibration rubber, etc, delivering a good 3D printing experience. Overall, Creality K1C is an option worth considering for those who are looking for high speed, high accuracy, and reliability.
How to Adjust Printing Speeds Based on Different Filaments?
Filament selection is also an important factor in 3D printing speed. Each filament type has its own maximum print speed. If it is not set properly, it can slow down the printing speed or even cause problems such as reduced print quality and print failure.
| Material | Normal Print Speed ( mm/s) | Note |
| PLA | 50-70 | PLA has a relatively low melting point, making it suitable for higher print speeds to maintain good detail and surface quality. However, printing too fast can cause extrusion problems and poor interlayer adhesion. |
| ABS | 40-60 | ABS requires a higher printing temperature and moderate speed for optimal results. Printing too slowly may result in an uneven surface, while excessive printing speeds may cause weak bonding and warping of the printed object. |
| PETG | 40-60
|
PETG is slightly slower than PLA, suitable for medium speeds for good print quality and adhesion. Appropriately lowering the print speed and increasing the extrusion temperature can further minimize stringing issues. |
| TPU | 20-40
|
TPU, an elastic material, requires a slower speed to avoid extruder head clogging and interlayer bonding issues. Printing too fast may cause extrusion problems and potentially warp or deform the printed object. |
| Nylon | 30-50 | For Nylon, a higher printing temperature and moderate speed are necessary for good printing quality and interlayer bonding. Either too slow or too fast print speeds can cause problems. |
| PC | Based on manufacturer guides | PC is known for its high strength and temperature resistance. For optimal results, a slower print speed and higher print temperature are required to improve adhesion between printed layers and minimize warping. |
Conclusion
3D print speed plays an important role in print quality, print time, and even the final cost. That’s why it’s especially crucial to learn what the best print speed settings are and how to adjust them. This comprehensive guide dives into everything you need to know about 3D printing speed to help you find the best 3D printing speed settings for optimal print results.
We hope this article was helpful! If you find this article helpful, please share it so more people can benefit!