.png "Product News, Tutorials, Tips and Industry Insights - ZWSOFT Blog - Stay up to date on the latest product news, tutorials, tips, and industry insights from ZWSOFT staff and influencers. Here we provide everything you need to help you get the most out of ZWSOFT products and succeed in your career.")
FDM 3D printers don’t always deposit filaments layer by layer to form a solid model. When the printing object with horizontal holes or overhangs, or when you want to reduce supports for less post-processing, 3D printing bridging comes into play. As a technique to improve print quality and expand design possibilities, it might already be familiar to you, but you may often struggle with recurring issues.
To help you out, this post will take you through a comprehensive understanding of what a 3D printer bridge is, the common causes of bridging issues, and how to avoid them during the 3D printing process to create better prints. Without further ado, let’s dive in.
What Is Bridging in 3D Printing?
3D printing bridging is akin to building a ceiling between two walls, where a horizontal structure is 3D printed between two raised points without any support. It is common when a model needs span gaps or holes. Ideally, a successfully 3D-printed bridge resembles the digital model with a smooth surface. This not only reduces support materials but also improves printing efficiency.
However, this technique places higher demands on material performance and model design. Good material ensures the bridge has sufficient strength and flexibility to span the two support points, while the design helps improve success rates by maintaining appropriate distances and overhang range. Additionally, printing parameter settings are also crucial for bridging. If these factors are not carefully managed, your 3D printed bridge may sag, deform, break, or become a potential hazard to the lifespan of the print.

Common Causes of Bridging Issues in 3D Printing
3D printing bridging is directly related to design, material, and print settings. Therefore, when issues arise, it’s definitely due to mistakes in one of these three stages. Here’s a breakdown of the common causes.
- Unreasonable Model Design: Shorter bridges are easier to print. If your bridge has a large span and is located higher in the model, it will be difficult to form a bridge;
- Unsuitable Materials: Different materials vary in bridging performance. ABS and PETG generally are not as easy to bridge as PLA because they cool more slowly and have less rigidity;
- Excessive Printing Speed: High-speed printing will prevent the extruded filament from cooling and solidifying in time, causing the bridge to sag or string;
- High Extrusion Temperature: The printing temperature should be set at a reasonable melting point. Otherwise, the material will flow too quickly to solidify stably;
- Insufficient Cooling: Not turning on the 3D printer’s fan can make it difficult for the filament to cool down, thus affecting the bridging effect;
- Poor-quality Printer: If the printer itself lacks mechanical precision or is prone to vibrate, it can be challenging for the 3D printed bridge to adhere, let alone form properly.
How to Make Better Bridging in 3D Printing?
With the analysis of bridging problem causes, you likely already have strategies in mind to address them. To help you further, 7 proven tips have been collected in the following. Put them to the test and make your bridging 3D printing better.
1. Optimized Slicing Software Settings
3D printing bridges are completed after the model is designed and converted to G-code through slicing software. Therefore, once the design is reasonable, optimizing the bridging settings in the slicing software is a good way to improve the results.
First, enable the bridging options in your slicer, like Cura or PrusaSlicer. Then, it’s especially important to optimize the printing paths. Proper selection ensures the bridge prints as smoothly and straight as possible. Next, reduce the layer height parameter, with 0.1-0.2mm being a good choice. This helps enhance the stability and success of bridging in 3D printing. If time permits, it is highly recommended to conduct some tests before the final print to find the best parameter combination and printing settings
2. Reduce Print Speed
Printing speed is also a parameter in your slicer that deserves attention and adjustment. Generally, lowering it is more recommended. Because this gives the filament more time to cool and solidify as it crosses gaps.
Also, a lower printing speed can reduce vibrations, ensuring the material is placed more accurately to create a smoother surface. Thus, if your 3D printing bridging is not progressing well, try to reduce the printing speed to 10-20mm/s, which is an optimal range. But be careful too low, as it can cause the filament to hang in the air and not print properly.
3. Lower Extrusion Temperature
Is your filament flowing too quickly and difficult to shape? If so, then the bridging issue might be related to the extrusion temperature. In this case, try to lower the 3D printer extruder temperature by a few degrees, such as 5° to 10°. If bridging remains challenging, the temperature is still not suitable. Continue lowering it in 5° to 10° increments until the filament extrudes smoothly and has enough time to solidify.
However, remember that the appropriate extrusion temperature varies for each FDM printing material. PLA is suitable for 180-220°C, ABS is recommended at 210-250°C, while PETG can be extruded well at 220-250°C. You need to find the right balance within these temperature ranges for optimal 3D printing bridging creation.
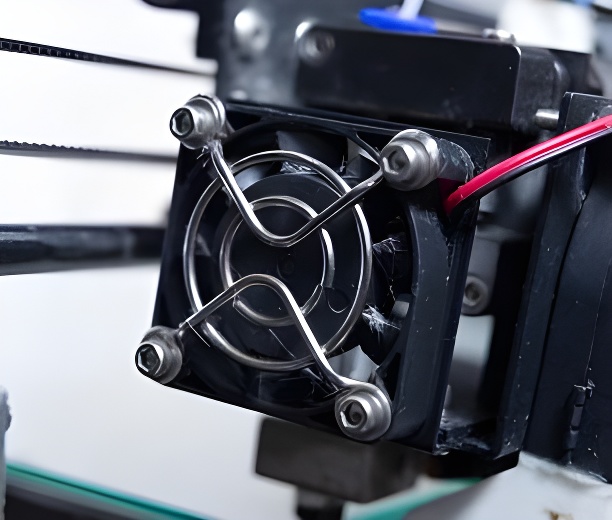
4. Increase Fan Cooling Speed
To prevent the extruded filament and 3D printed bridge from becoming a blob of melted plastic, the use of cooling fans is essential. In the first few layers of the print, you can turn on and adjust the cooling fan as needed. However, for parts that require bridging, it’s suggested to increase the fan speed to help quickly cool the extruded material. If you’re unsure of the optimal settings, start with 100% fan power and gradually decrease it until the 3D printing bridging cools properly.
5. Fine-Tune Model Orientation
3D printing bridging inevitably involves parameter adjustments and even many pre-print tests. If you don’t have the time for these or prefer to skip them, consider another approach from a different angle. That is, you can use the rotate tool or adjust the XY axis in the slicer to reorient the model and reduce overhangs. Alternatively, try to set the overhanging parts to shorter spans, making bridging easier. However, there is a 45° rule you have to adhere to: if the overhang is greater than 45°, supports better be added.
6. Choose Suitable Materials
If 3D printed bridges always fail you, it might be time to reconsider whether you’ve properly prepared from the start, such as in your choice of printing materials. Different FDM printing materials vary in bridging performance. PLA cools quickly and has high rigidity, making it one of the best materials for bridging.
ABS and PETG are also good options, but ABS tends to warp during cooling, and PETG cools more slowly. Both involve more precise control of printing speed and cooling fans. The least recommended materials are TPU, Nylon, and PC. Although they are FDM printing materials, their 3D printing bridging performance is worse. They either require special support or extra attention to cooling, making the process time-consuming and troublesome.
7. Optimize Model Design
Model design is equally important to reconsider. It is the most important part of the entire 3D printing bridging process. If the bridge design in your model has unreasonable layer heights or spans, it will not print successfully. So for this moment, you need to use software like ZW3D, which integrates CAD, CAE, and CAM, to modify or even redo these flawed designs.
Beyond that, adding extra support to the overhanging part is also worth considering. This can reduce the bridge span and improve the printing success rate. Alternatively, the entire digital model can strategically be divided into different parts to decrease the bridging length and difficulty of each part. But noted that the two effective optimization measures will come with an increased post-processing workload.
| Note: ZWSOFT recently launched ZW3D 2025, which not only enhances user experience but also introduces features that can significantly boost productivity. It is the top choice for 3D modeling in recent years. You can download a trial version from the download center. |
FAQs About 3D Printing Bridging
Why Do Bridging Sections Experience Sagging?
Unreasonable printing parameter settings are a major cause of sagging in 3D printed bridges. High nozzle temperature, printing speed, and lack of cooling can all make the filament flow too easily. This will lead to the next layer being added before the previous one has completely solidified. As a result, the bridge sags due to its inability to support its own weight along with the newly printed layer.
Additionally, excessive bridge spans and insufficient support are also the reasons. These factors can be attributed to poor model design, where even solidified material on the bridge struggles to maintain a stable shape between raised points. Of course, if you want to fully troubleshoot the cause, the printer’s precision and material selection also need to be considered to avoid errors from the outset.
How Can the Surface Quality of Bridging Sections Be Improved?
Firstly, it is advisable to choose from the three commonly used FDM printing materials: PLA, ABS, and PETG. They all come with good bridging performance and can provide smooth and uniform 3D printing bridging surfaces when operated correctly.
Next, fine-tuning the printing parameters to a reasonable range. This ensures that the filament flows evenly and fully solidifies during bridging.
At last, remember to activate the cooling fan to aid in material curing and reduce surface defects such as stringing.
Conclusion
As a common technique, 3D printing bridging can be quite hard in practice and often leads to various issues. But these problems are traceable and can be attributed to factors such as materials, printer equipment, and printing parameters.
Moreover, many corresponding solutions can be found by troubleshooting such root causes. Armed with these insights and guidance listed above, hope you can successfully tackle bridging challenges and reach new heights in 3D printing creations.