In the field of architectural design and planning, the creation of detailed and precise floor plans is a fundamental task. These plans not only meet the need for accuracy and intricacy but also aid in visualizing and optimizing space utilization, serving as crucial blueprints for architectural projects. Among various software options for designing 2D floor plans, AutoCAD stands out as the leading professional drafting solution, known for its precision and versatility. Its robust features and flexibility make AutoCAD floor plan an ideal choice for architects, engineers, and designers.
This article takes an in-depth look at the step-by-step tutorial of how to draw 2D floor plans in AutoCAD, showing how its advanced tools and features can help you bring architectural visions to life. Additionally, we will introduce more cost-effective alternatives that offer similar functionalities, catering to those seeking economical yet efficient solutions.
Steps to Draw a Floor Plan in AutoCAD
Creating a detailed and accurate floor plan in AutoCAD is a fundamental skill for architects, designers, and draftsmen. Here we list the detailed steps of AutoCAD floor plan, from setting up your workspace to adding intricate details and annotations.
Step 1: Preparation
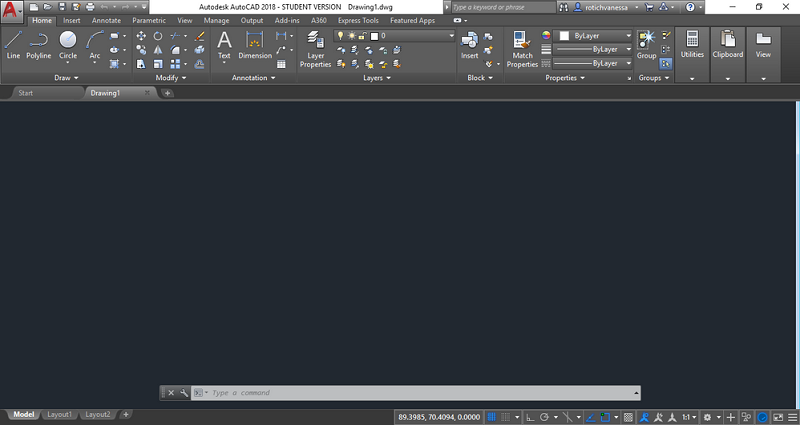
Begin by setting up your AutoCAD workspace. This involves initial steps like installing the AutoCAD software, understanding the specific design requirements of the floor plan, and setting up the drawing file with appropriate parameters. You should select appropriate units (e.g., meters or feet), define the paper size, select a suitable scale, and familiarize yourself with basic commands and the interface.
Basic commands include:
- Line = L
- Poly-line = PL
- Offset = OFFSET
- Arc = A
- Circle = CIRCLE
- Trim = TRIM
- Object snap = OS
- Copy = CTRL + C
- Paste = CTRL + V
- Delete = DELETE
- Cancel current command = ESC
Utilizing these shortcuts can significantly speed up the AutoCAD floor plan drawing process, and these foundational steps are critical for a smooth and efficient drafting process. Also, you can choose other free floor plan software to get started if AutoCAD is too expensive for you.
Step 2: Create External Walls
Now you can start to draw a 2D floor plan on AutoCAD. Use commands like “Line” or “Rectangle” to draw the outer walls of your structure. Please pay attention to the thickness of the walls and the overall dimensions, ensuring they are to scale. These steps are crucial for accurately establishing the building’s shape and size. Here’s how:
- Click the “New” button in the top toolbar and select the “Tutorial i-Arch” template to start a new drawing.
- Click “Paper” in the status bar at the bottom of the screen to switch to the model space.
- When the drawing panel pops up, click on the ribbon in the “Home” tab and then click on “Rectangle” to draw the outside of the exterior wall.
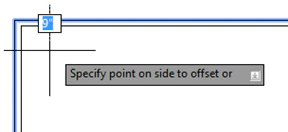
- Apply the “Offset” command to specify the wall thickness, for example, 9 inches.
- Select the rectangle and then specify an inside point to create the other side of the wall. Finally, press “Enter” to exit the “Offset” command.
Step 3: Draw Interior Walls
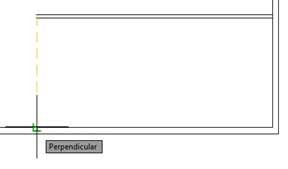
Similar to the exterior walls, use the “Line” or “Polyline” command to draw the location of the interior walls. Internal walls are usually less thick than external walls, so use the “Offset” tool to select a smaller offset distance. When drawing the interior walls, pay attention to the connection points with the exterior walls to ensure that the wall joints are accurate. Drawing interior walls in AutoCAD can be done as follows:
- Type “MLINE” in AutoCAD and press Enter to start the double line tool.
- Type “w” and enter dimensions to set the width of the interior wall, usually 4 inches.
- Click on the desired starting point to create the wall.
- You can use the “Osnap Overrides” and, “Nearest” and “Perpendicular” options to ensure guaranteed accuracy.
- Finally, click a point on the interior of the building and on the south facade to set the end point of the wall, and then use the Enter key to exit the command.
Step 4: Add Furniture, Decor, and Windows
Utilize AutoCAD’s extensive block library to insert furniture, decor elements, and windows into your plan for a realistic and functional layout. This is an important step that helps provide a visual representation of the design and helps users understand the layout and function of the space.
Furniture and decorations are typically added using predefined blocks in AutoCAD. These blocks represent items like furniture, light fixtures, artwork, plants, etc., and can be easily inserted into the drawing. Use the “INSERT” command to place the desired blocks in the floor plan. You can specify insertion points, scale factors, and rotation angles. Adjust the position and orientation using commands like “MOVE”, “ROTATE” and “SCALE” to fit them appropriately in the space.
Windows can be represented either by simple line drawings or more detailed block symbols, depending on the level of detail required. Draw windows using tools like “LINE”, “RECTANGLE”, or specific window blocks. Position them accurately within walls, ensuring they reflect the intended design and functionality. Adjust the relationship between the windows and walls, ensuring the windows are properly integrated into the wall structures.
Step 5: Annotation and Dimensioning
Conclude your design by adding necessary annotations and dimensions for clarity and reference, using tools such as “Dimension”, “Text”, and “Leader”.
You can use the “TEXT” or “MTEXT” commands to add labels and descriptions that provide information such as room names and features. Customize the font, size, and style of your text to make it legible and consistent with your drawing’s standards. You can add common symbols like north arrows, section marks, or material symbols, and then use the “LEADER” command to create lines that connect annotations to specific points or objects in the drawing.
You can also use the “DIMENSION” command to create clear and readable dimensions for walls, doors, windows, and other elements. This is critical to understanding the scale and size of different elements. Use “DIMLINEAR” to add horizontal, vertical, and aligned linear dimensions. Use “DIMANGULAR” to measure the angle between two lines or two points. Use “DIMRADIUS” to measure radius dimensions for circles and arcs and “DIMDIAMETER” for diameters.
Is AutoCAD Good for Floor Plans?
AutoCAD is indeed an excellent tool for floor plans, widely used by architects, engineers, and builders for various architectural projects. AutoCAD drawing floor plan can be represented in both 2D and 3D, showing the spatial relationships between rooms, spaces, and various elements such as doors, windows, and furniture.
While AutoCAD is a comprehensive tool for floor plan creation, its cost can be a barrier for those who only need basic features. All subscription plans of AutoCAD are time-based: $245/month, $1975/year, and $5925/3 years, which are too expensive for individual users and small businesses. The good news is that there are several free 2D CAD software options suitable for simple floor plan drafting. But for users desiring professional-level software with a broader range of advanced features, excellent AutoCAD alternatives like ZWCAD offer a more budget-friendly solution.
ZWCAD stands as a robust AutoCAD alternative, offering an excellent balance of functionality and affordability. It mirrors AutoCAD’s comprehensive features and familiar interface, facilitating a smooth transition for existing AutoCAD users. Compared to AutoCAD, ZWCAD is lighter on system resources, needing only 2GB of running memory. It achieves faster and more efficient performance through its efficient utilization of multi-core CPUs and a focus on essential, modern functions.
In terms of pricing, ZWCAD offers a more affordable option compared to AutoCAD, with flexible purchasing options. Users can either subscribe to ZWCAD for a starting price of $322 per year or opt for a one-time purchase starting at $899 for a perpetual license. In addition, ZWCAD supports various APIs for easy development and migration of third-party applications. It also maintains good compatibility with DWG files, which is crucial for sharing and collaborating on floor plan designs. Unique features like Smart tools, Area Table and Flexiblock further streamline floor plan creation.

All these features, coupled with its cost-effectiveness, make ZWCAD a suitable choice for users seeking a comprehensive yet budget-friendly CAD tool and the best alternative to the AutoCAD floor plan, catering to a wide range of users from beginners to professionals.
FAQs About AutoCAD Floor Plan
What Are Common AutoCAD Commands for Floor Plans?
When creating floor plans in AutoCAD, some common commands used include:
- Line (Press L + enter): for drawing straight lines.
- Offsets (Press O + enter): to create parallel lines at a specified distance.
- Copy (Press Co + enter): to duplicate selected objects.
- Move (Press mo + enter): for relocating objects.
- Trim (Press tr + enter): for cutting away unnecessary parts of objects.
- Extend (Press ex + enter): to lengthen lines to meet another line or boundary.
- Mirror (Press mi + enter): to create a mirror image of objects.
- Rotate (Press ro + enter): for changing the orientation of objects.
- Group (Press gr + enter): to connect selected objects as a whole.
- Explode (Press exp + enter): to divide objects into their component parts.
- Hatch (Press H + enter): for applying patterns like concrete, glass, wood, etc., to closed boundaries.
- Arc (Press arc + enter): for creating curved lines, often used for door symbols.
Is There a Video Tutorial for Creating a 2D Floor Plan on AutoCAD?
Yes, there are video tutorials available for creating simple AutoCAD floor plan, and you can find these tutorials on various online platforms, For example, Udemy offers a course called “AutoCAD – Learn How to Create a 2D Floor Plan“. The course is designed to teach you how to create 2D floor plans from scratch in AutoCAD. It covers everything from basic concepts to advanced skills, and provides real-world projects and examples, making it suitable for learners of all levels. This tutorial is perfect for anyone looking to improve their architectural drafting and interior design skills using AutoCAD.
Conclusion
In summary, this article details specific step-by-step ways to create an AutoCAD floor plan, from preparation to annotation and dimensioning. We also provide a comprehensive set of commands as well as a video tutorial path to help users draw and design effectively. While AutoCAD is a powerful tool for creating floor plans, it is not necessarily the best choice, especially for those who may find AutoCAD’s price and learning curve a bit daunting.
For individuals or businesses looking for a more cost-effective but equally efficient solution, ZWCAD emerges as a compelling alternative. Not only does it have most of the features of AutoCAD, but it also offers enhanced performance and more affordable pricing. This makes ZWCAD an ideal choice for individuals seeking a user-friendly yet professional CAD solution for floor plan drafting, blending efficiency with cost-effectiveness.